Easy Web Application Back Ups with SnapShooter
Introduction
DigitalOcean offers a variety of products and services. From our simple-to-use Droplets to our managed Kubernetes services, you can run a blog, a business, and everything between and beyond. Part of the DigitalOcean Family, SnapShooter enables users to back up their files, apps, and databases.
In this tutorial, you will learn how to use Snapshooter to back up an application from a one-click WordPress installation on DigitalOcean to another Droplet. This will allow you to keep a live backup of your application in a different region, allowing you to stay up even as one location goes down.
Prerequisites
- A DigitalOcean Account (Haven’t got one? Start your free trial now and grab $200 in credits.)
- A DigitalOcean Space
- A DigitalOcean Spaces Access Key
- A SnapShooter Account
- A Pre-existing WordPress Site
Backing up Your WordPress Site with SnapShooter
SnapShooter requires a connection to an S3-compatible object storage to archive the backups. Once the Space and the Spaces Access Keys have been created, navigate to SnapShooter and External Storage in the left sidebar.

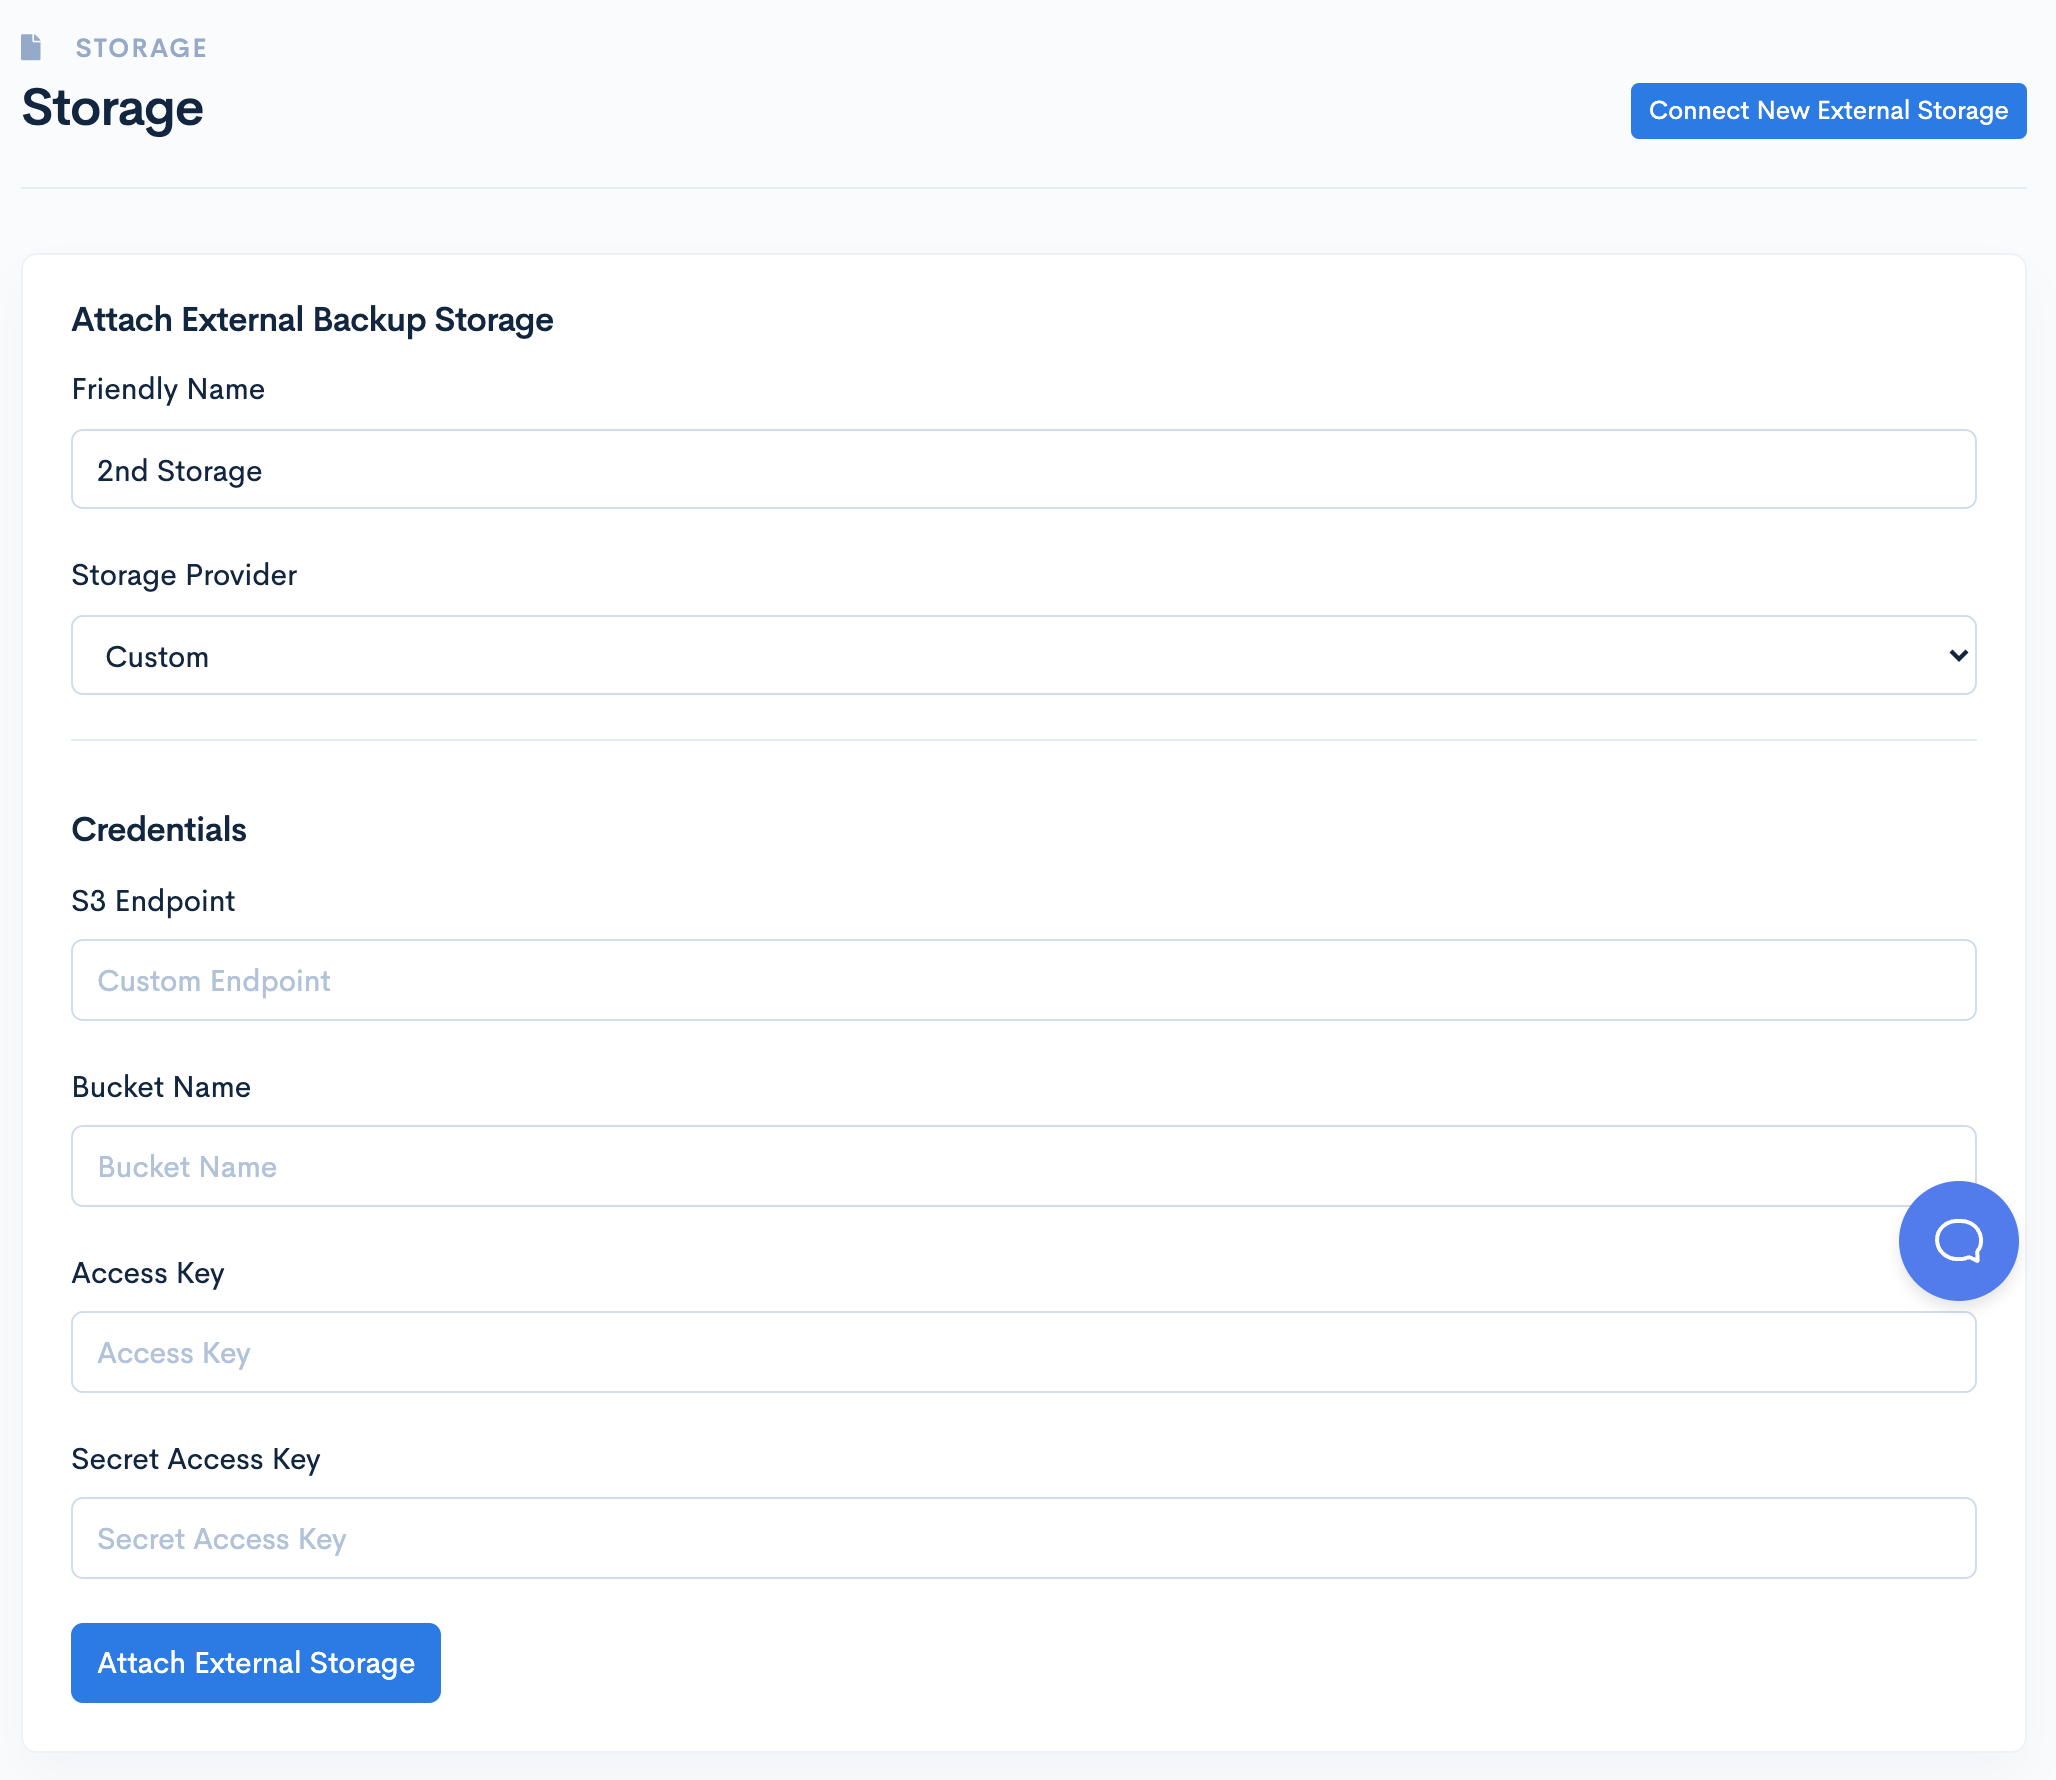
Click Connect New External Storage in the top right corner. In this form, you will input the storage details:
Friendly Name: {Storage Name}
Storage Provider: Custom
S3 Endpoint: {DO Region}.digitaloceanspaces.com
Bucket Name: {Spaces Name}
Access Key: {Spaces Access Key}
Secret Access Key: {Spaces Access Secret}
Once you’ve verified the storage connection details, click Attach External Storage.
Next, click Servers from the left navigation menu. If there is no SSH key associated with SnapShooter, it will give the option to generate one. Click Generate First SSH Key or Connect Server.
It will bring you to the Connect New Server screen where you can choose to use one of the generated SSH Keys available in the drop down menu or generate a new one on the right. For this tutorial, we’ll choose the key we just created which will provide a cURL statement. Copy the cURL command and return to the server where your WordPress site is located. In this Demo, we are using a DigitalOcean Droplet as our backup source.

Once we log into DigitalOcean, we can click Droplets in the left navigation and choose the server which hosts our site code. From the Droplet Dashboard, we can click Access then Launch Droplet Console which will let us access that Droplet. Paste the cURL command from SnapShooter which will register the SnapShooter SSH Key on the Droplet and register the Droplet with your SnapShooter account. When we return to SnapShooter, it will have a dashboard for this server displaying the connection details and a list of back up recipes for this server. Since this server is new, the list will be empty with a button Configure first backup recipe.
In the Jobs / Create screen, we will be provided a list of existing recipes. Select the WordPress recipe to display an overview of the recipe requirements and description. Input a name for your backup job in Name then click Continue.
You will be brought to a screen where you can choose a server for your backup job. Select the server added previously in the dropdown menu, then click Next.
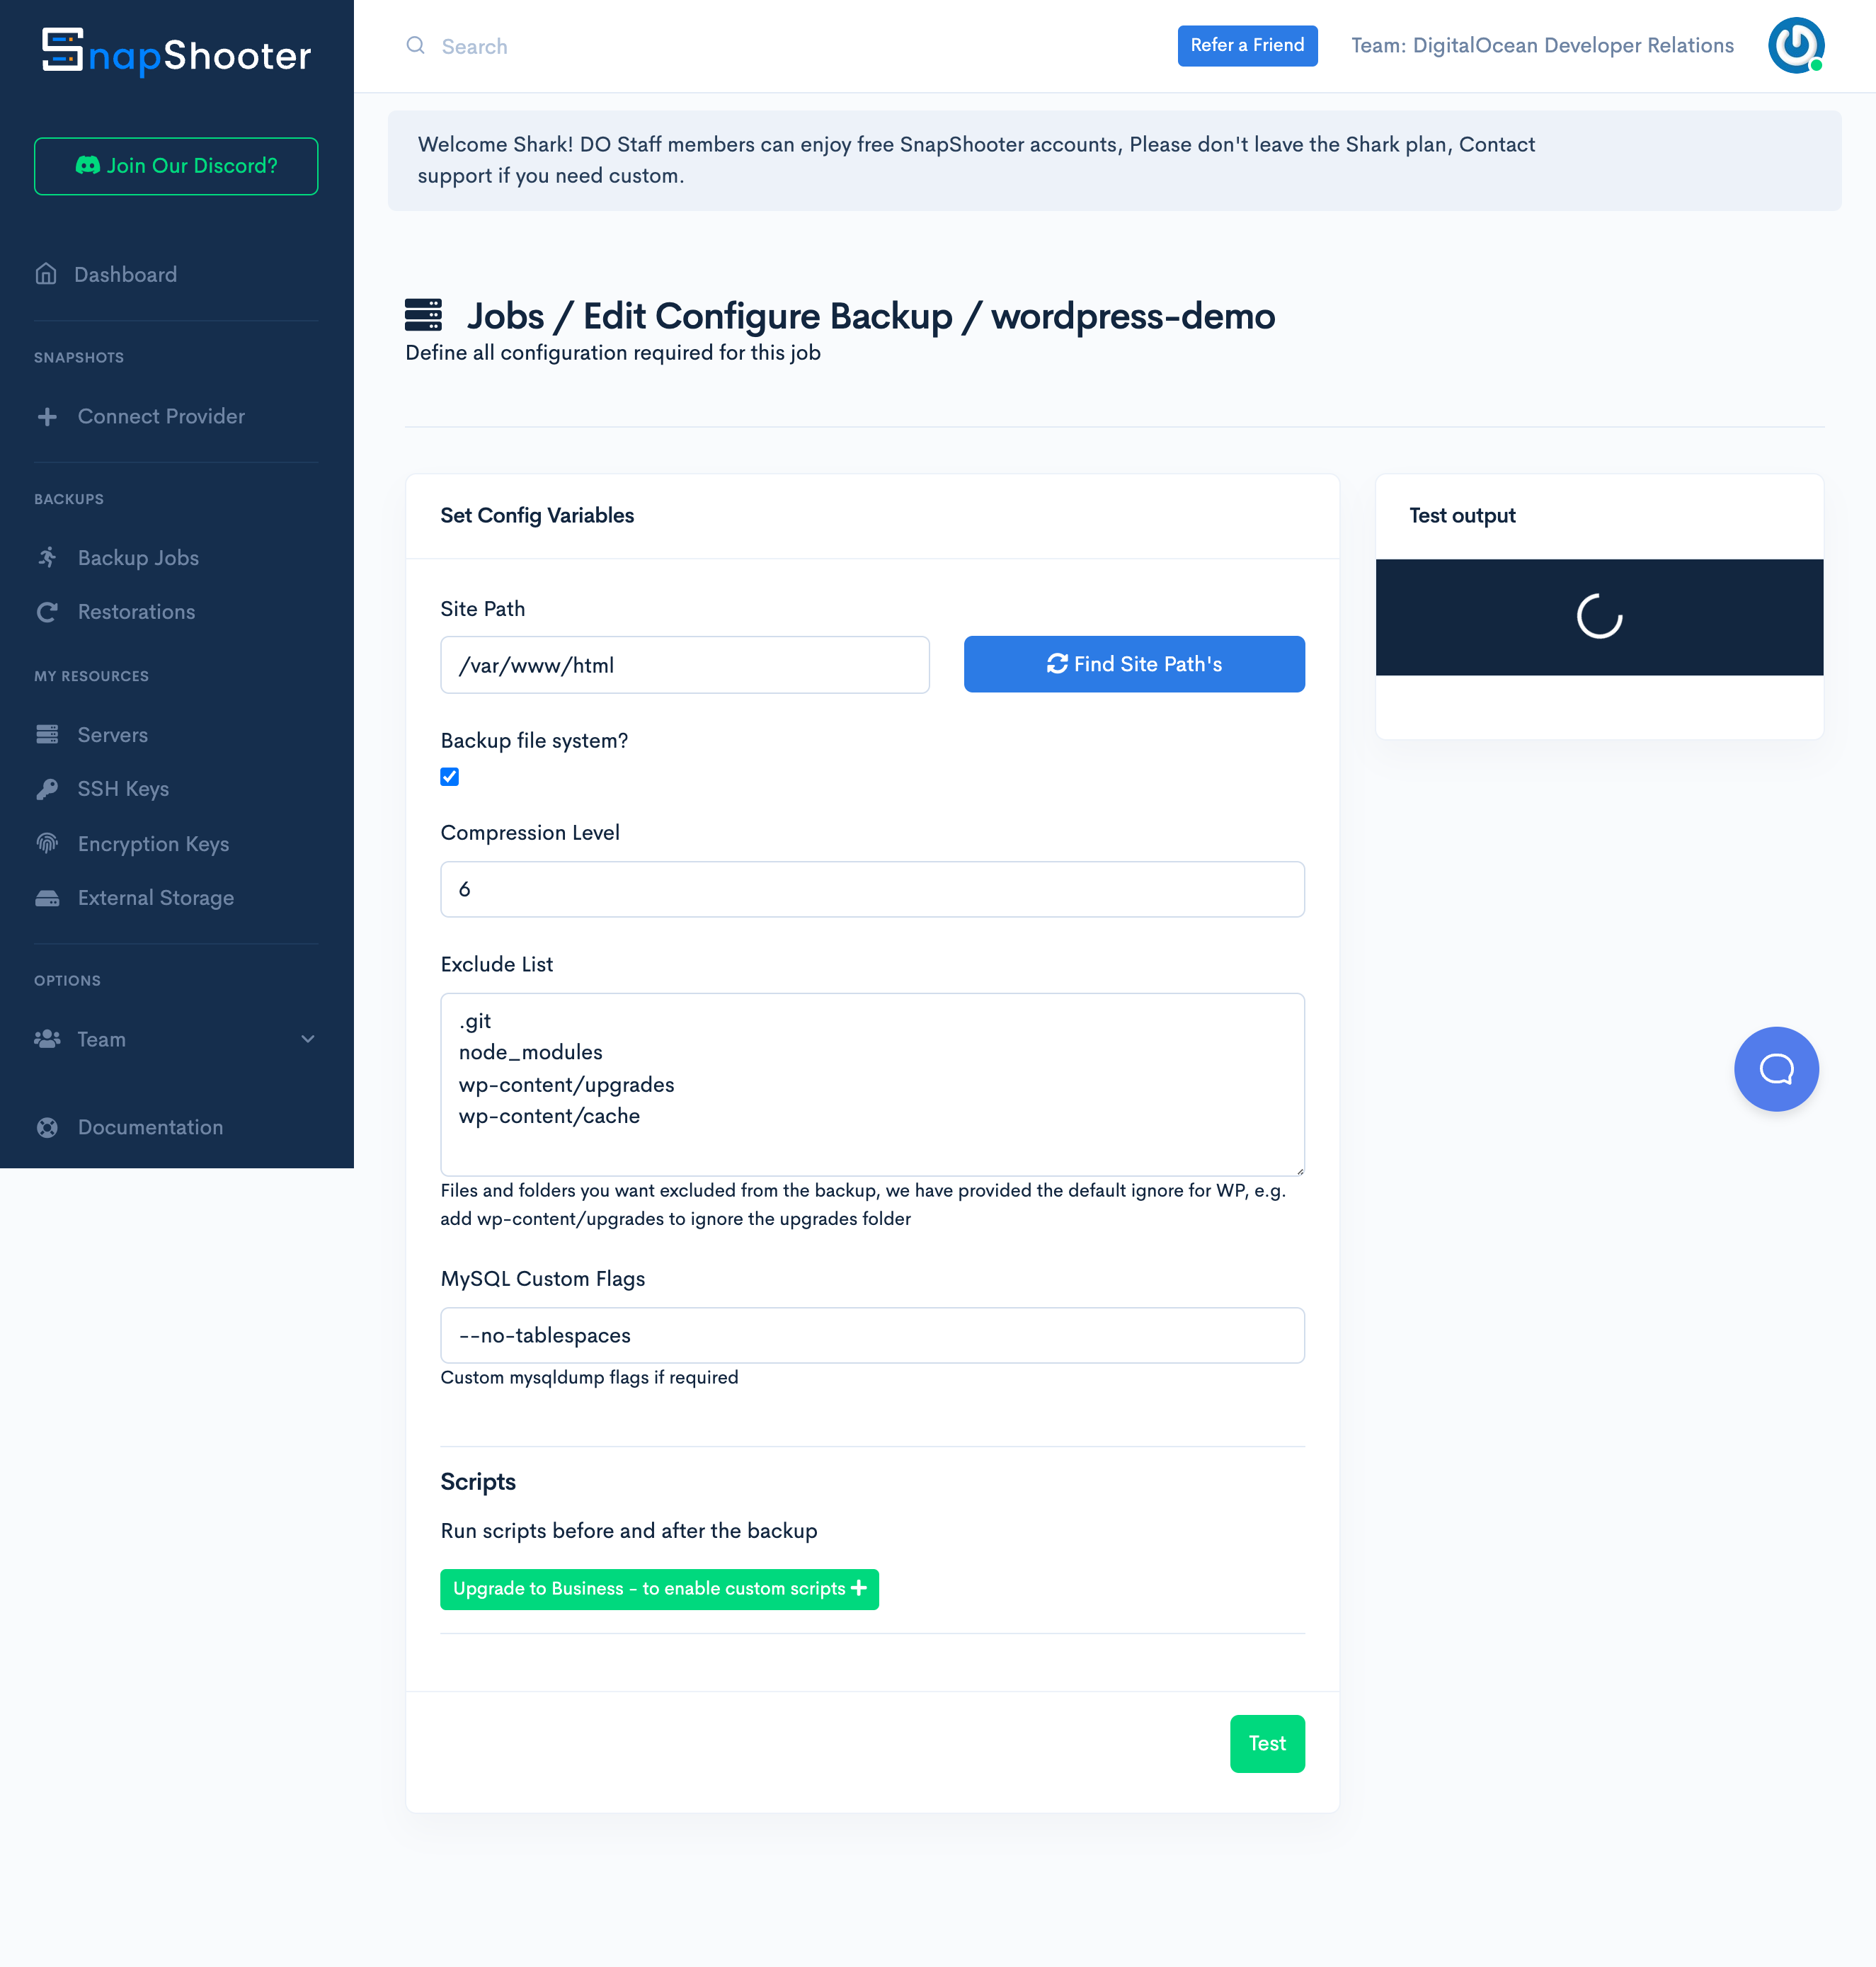
Now we will be able to configure our backup job by setting the site path, compression level, exclude list, and custom flags. We will make two changes to the default configuration. The first is to set the Site Path to /var/www/html where our website code will be restored. The second are the MySQL Custom Flags. Due to a recent change in MySQL, we will remove the --single-transaction flag. Once those are set, click Test. When the test is complete, it will display the MySQL tables it will back up. If you see the WordPress tables, click Save and Next.

We can then set our storage. Choose the DigitalOcean Space we connected earlier, then click Set Storage. The next screen allows us to schedule our backups including frequency, timezone, time of day, and retention policy or how many backups we plan to keep at any given time.
For the purposes of this tutorial, we left the schedule on its defaults and set the Retention Policy to 1. Click Set Schedule and Finish.
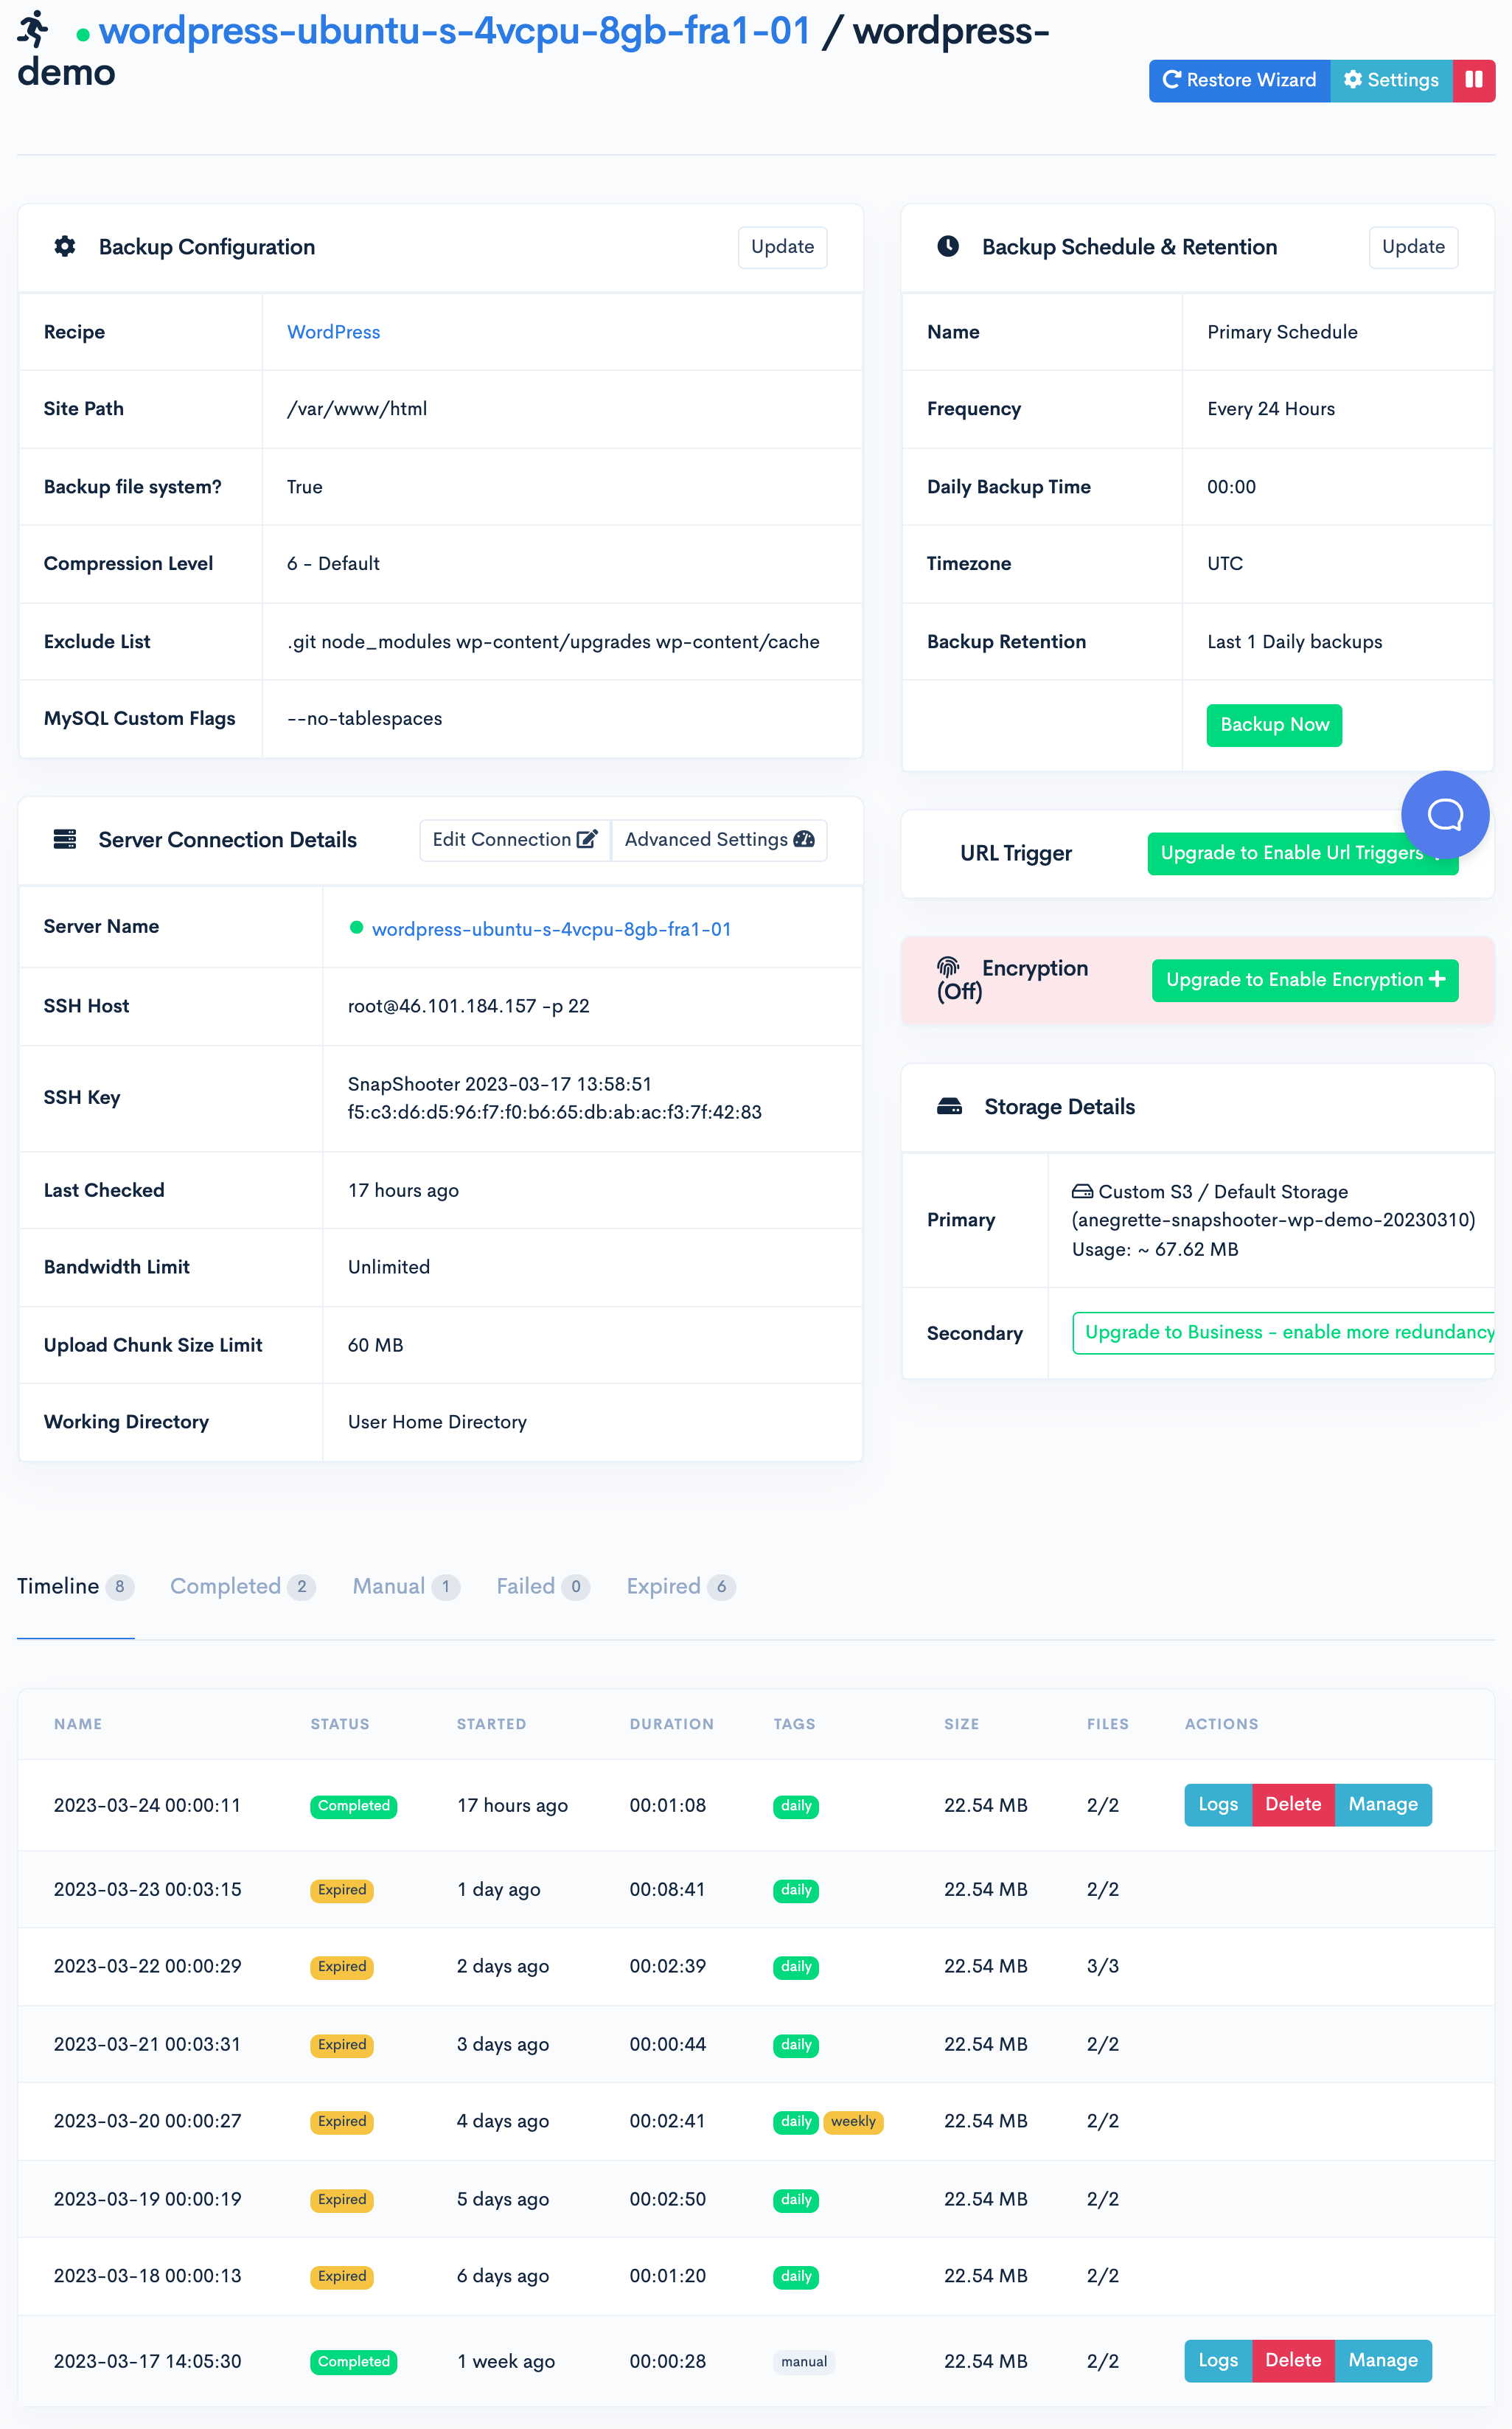
Finally, this will display the back up job dashboard that will provide details for the Backup Configuration, Server connection Details, Backup Schedule and Retention, Storage Details, and other options at a glance. Start the first backup by clicking Backup Now in the Backup Schedule and Retention section.

When the backup job starts, it will bring up the detailed dashboard for that job where you can see CPU usage, memory usage, as well as the progress and relevant outputs. When the job is complete, you will have a snapshot that can be restored in place using the Restore button or can be restored to a second server.
Setting up Your Second Server
We will spin up a new Droplet to act as a second location for our website to live, ensuring the primary site stays online even if the original server is not reachable.
In your project page in DigitalOcean, you can click the Create dropdown menu at the top and select Droplet. In the Create Droplet screen, we’ll provision it in a different region with the same specifications as our original Droplet which was provisioned in SFO3.
For reference, our new configuration is as follows:
Region: NYC
Datacenter: NYC3
Marketplace Image: LAMP on Ubuntu 20.04
Droplet Type: Basic
CPU Options: Regular, 8GB 4CPUs, 160 GB SSD Disk, 5 TB transfer
Once the server is provisioned, click Access then click Launch Droplet Console to access the server’s command line. Log into MySQL by entering mysql into the command line. Create an empty WordPress database with create database wordpress;. When done, leave MySQL with exit;.
Now you have a destination server and WordPress database ready for your backup to be restored.
Restore the Backup onto the Second Server
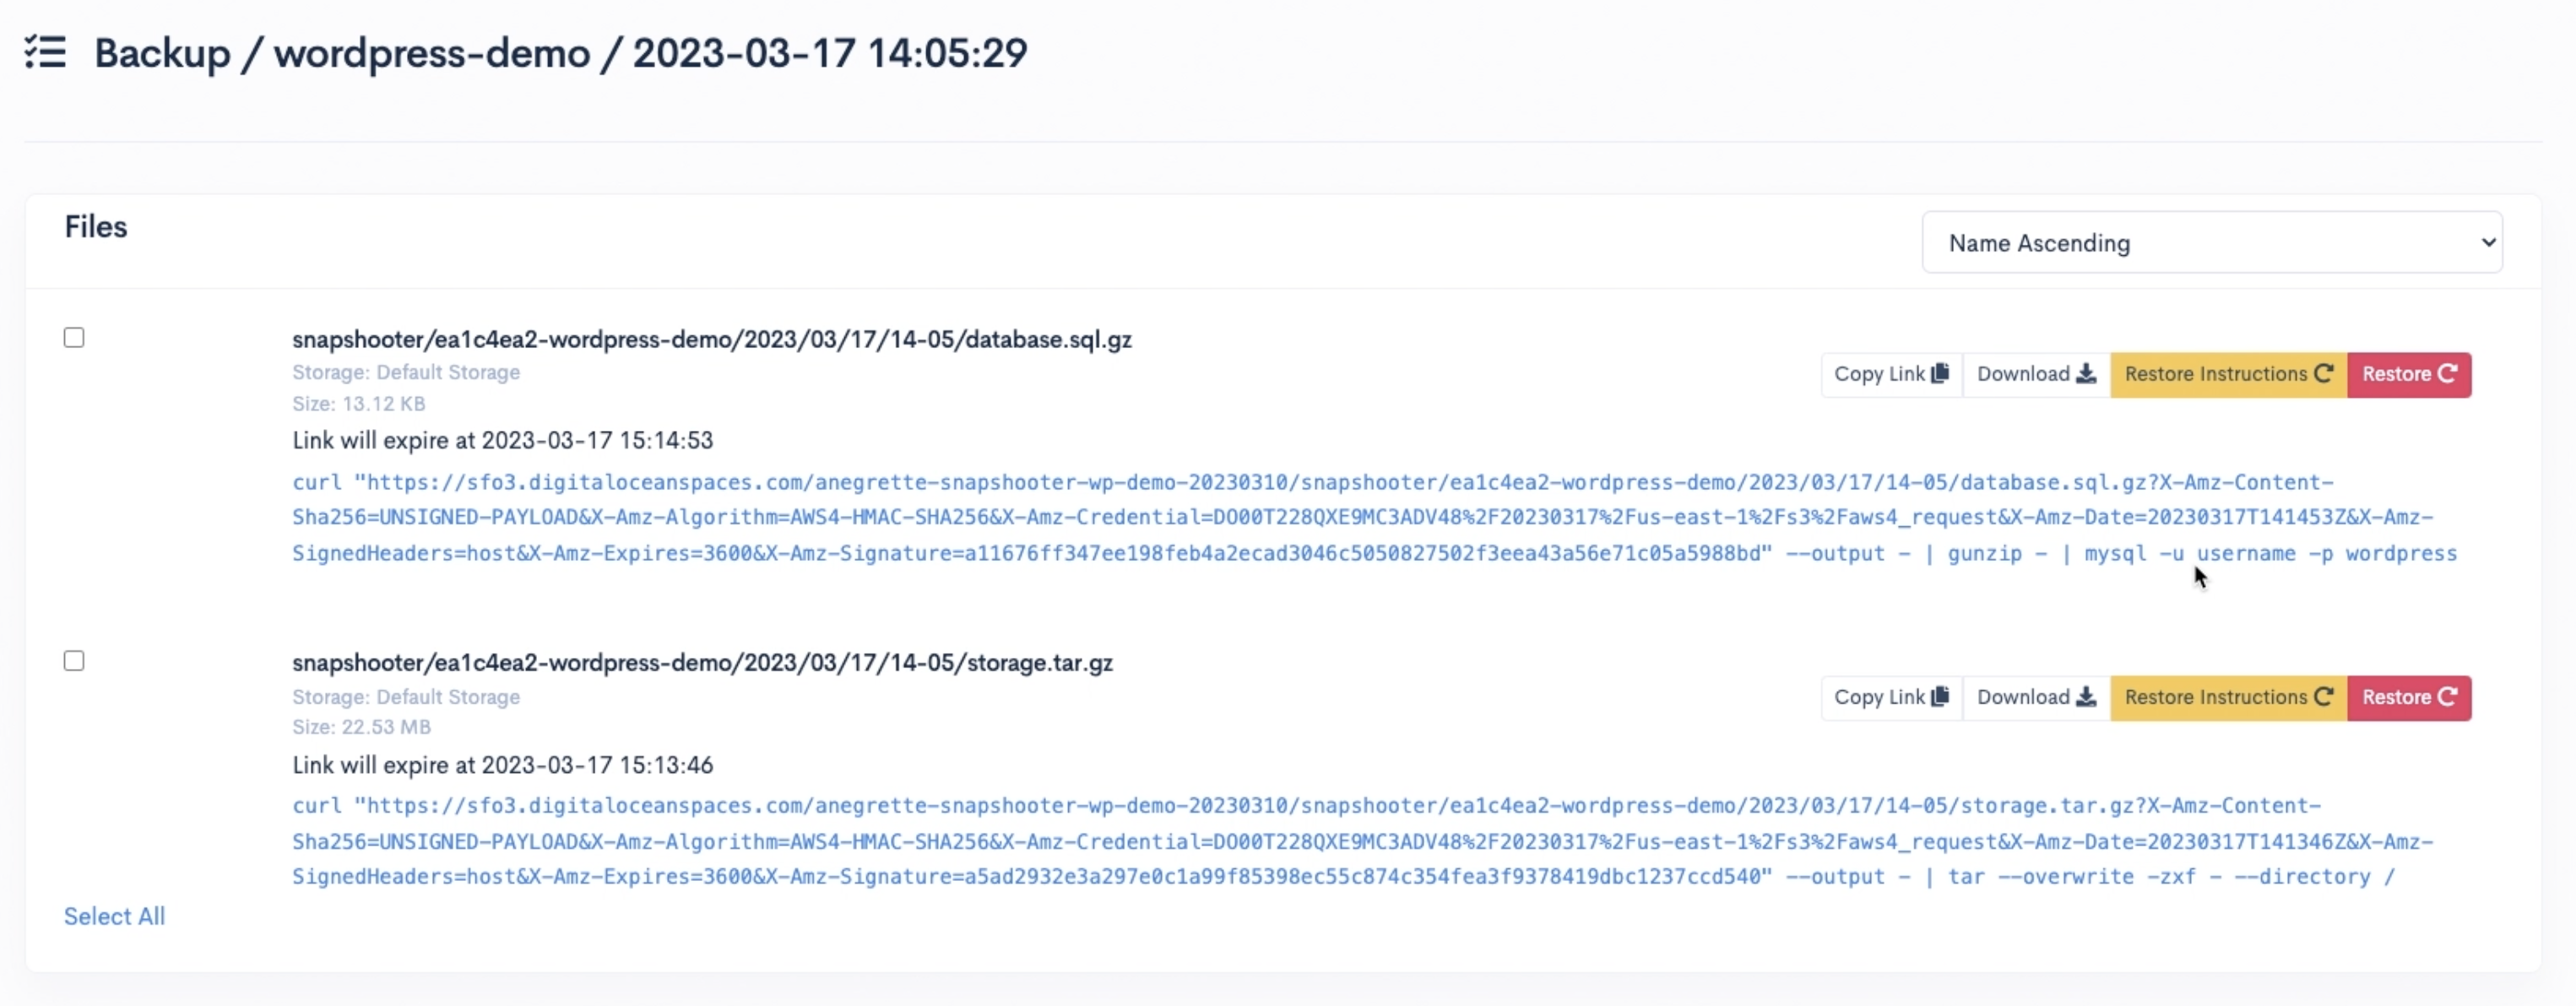
Once the environment is set up on your second server, you can begin the restoration process. Navigate to the Backup Jobs and select View for the Backup Job we had set up. Scroll down to Timeline and select Manage from one of the completed jobs. This will take you to a listing of the backed up files.

First, we’ll restore the file ending in storage.tar.gz which contains our website code. Navigate to the Backup Jobs in the left navigation panel. Click View on the job that you want to restore to return to the Backup Job Details. Scroll down to your timeline of backup jobs. On the most recent completed backup job, click the button on the right labeled Manage. This will bring you to a detailed list of files associated with a particular backup job. With each file, you’ll see an option for Restoration Instructions. Click Restoration Instructions to reveal a cURL command. Copy the cURL command and return to the destination Droplet. Paste the cURL command and the backup will download from SnapShooter and extract in the path defined in the backup job configuration.
Next, we’ll restore the file ending in sql.gz which contains our database schema and website data. Return to the completed backup’s list of associated files and click Restore Instructions for the sql.gz file. Copy the cURL command and return to the destination Droplet. Paste the cURL command but change username to the username you used to create your empty wordpress database.
WordPress will require a MySQL user to access the new database. To create this user, we’ll go to the WordPress configuration at /var/www/html/wp-config.php. Note the MySQL credentials found in the file. Then, create a new user after logging into MySQL the following command after replacing {username} and {password} with the credentials found in the previous configuration file.
create user ‘{username}’@’localhost’ identified by {password};
For the purposes of this tutorial, we will grant all rights to the website user, however in a production scenario you want to limit the number of privileges to only those required for the user to complete their tasks..
Now, go to your droplet, copy its IP address, and paste it into the browser. Your website should now be restored and viewable in this new destination.
Conclusion
In this tutorial, you created a backup job in SnapShooter and restored it into a new region. We encourage you to ensure your servers, databases, and applications are always backed up with SnapShooter and get started building with DigitalOcean today.
Check out this DigitalOcean Onboarding Series video playlist with even more guidance on how to optimize your DigitalOcean products and services.