How to Manage SSL Certificates on DigitalOcean Teams
Some product features, like load balancer SSL termination and custom Spaces CDN endpoints, require SSL certificates. The certificates section of your account security page lets you manage the SSL certificates uploaded to your account.
You can use our Let’s Encrypt integration to create fully-managed SSL certificates. You can also manually upload custom certificates or certificates from a commercial certificate authority.
To manage your team’s SSL certificates, from the main menu on the left side of the control panel, click Settings, then click the Security tab at the top of the page. The Certificates section lists information about any existing certificates, like their names, SHA1 fingerprints, and expiry dates. If you have not added a certificate before, the section is named Certificates for Load Balancers and Spaces.

Add Certificates
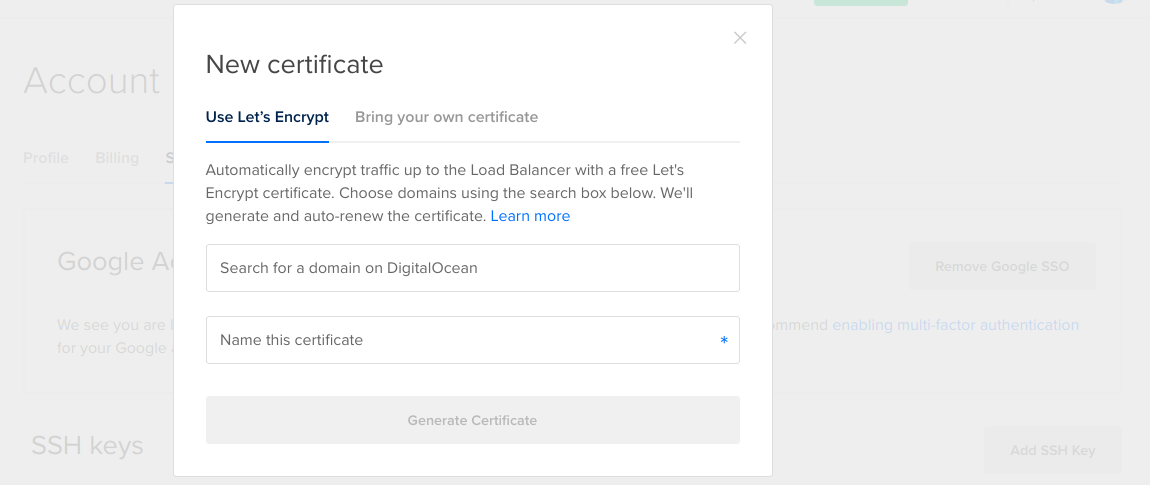
To add a new certificate to your DigitalOcean account, click Add Certificate to open the New Certificate window.

This window has two tabs for the two ways to add a new certificate:
-
Use Let’s Encrypt to create a fully-managed SSL certificate. Choose this option if you want us to create a new certificate that we automatically renew on your behalf.
-
Bring Your Own Certificate to upload an existing certificate. Choose this option if you want to upload a certificate you already have and understand that you are responsible for manually updating it when it expires.
If you manage your domain with DigitalOcean DNS, you can choose the Use Let’s Encrypt option to create a new, fully-managed SSL certificate. We’ll create and automatically renew this certificate for you.
Select the domain you want to use, then optionally select:
-
Include all subdomains (wildcard certificate) to create a wildcard certificate that secures the domain’s apex and any subdomains that do not have an existing DNS records defined.
-
Select other subdomains to include to create a certificate that secures the domain’s apex and any subdomains selected in the subdomains menu.
You can choose to automatically create a new DNS A record for the apex domain pointing to the load balancer, but we will not create or change DNS records for subdomains. If your subdomains do not already point at the load balancer, you need to add DNS records for that.
You can also opt out of any DNS record creation by unchecking the Create DNS records for all the new Let’s Encrypt certificates box.
After you select the domain and any additional options, enter a name for the certificate, then click Generate Certificate.
If you want to upload an existing certificate, or if you prefer to manage your DNS with another provider and want to generate your own, choose Bring your own certificate.
You need to fill in four fields:
-
Name. This is a name you choose to identify the certificate in the DigitalOcean interface. It can only contain letters, numbers, periods, and dashes.
-
Certificate. This is the actual SSL public key or certificate file.
-
Private key. This is the secret key associated with the certificate.
-
Certificate chain. This is the full trust chain between the trusted certificate authority’s certificate and your domain’s certificate.
After you fill out these fields, click the Save SSL Certificate button.
Delete Certificates
To delete a certificate from your account, first unlink it from any Spaces or Load Balancers it may be attached to. Once unlinked, click More and then Delete from the certificate list:
