How to Convert Backups to Snapshots

Backups are automatically-created disk images of Droplets. Enabling backups for Droplets enables system-level backups at weekly intervals, which provides a way to revert to an older state or create new Droplets.


Backups and snapshots are both disk images of Droplets. Backups are taken automatically and retained for four weeks, but snapshots are taken manually and retained until you choose to delete them. If you want to keep a backup indefinitely, you can convert it to a snapshot.

Note
When a backup is converted to a snapshot, snapshot pricing applies.

Convert to a Snapshot using the API

To convert a backup to a snapshot using the API, use the image actions endpoint and set the type field to convert.

How to add an image to a region using the DigitalOcean CLI

To add an image to a region via the command-line, follow these steps:

  1. Install doctl, the DigitalOcean command-line tool.

  2. Create a personal access token, and save it for use with doctl.

  3. Use the token to grant doctl access to your DigitalOcean account.

                  doctl auth init
                
  4. Finally, add an image to a region with doctl compute image-action transfer. The basic usage looks like this, but you'll want to read the usage docs for more details:

                  doctl compute image-action transfer <image-id> [flags]
                

    The following example transfers an image with the ID 386734086 to the region with the slug nyc3

                       doctl compute image-action transfer 386734086 --region nyc3
                    
How to add an image to a region using the DigitalOcean API

To add an image to a region using the DigitalOcean API, follow these steps:

  1. Create a personal access token, and save it for use with the API.

  2. Send a POST request to https://api.digitalocean.com/v2/images/{image_id}/actions

    cURL

    To add an image to a region with cURL, call:

    
                    # Transfer an Existing Image
    curl -X POST \
      -H "Content-Type: application/json" \
      -H "Authorization: Bearer $DIGITALOCEAN_TOKEN" \
      -d '{"type":"transfer","region":"nyc2"}' \
      "https://api.digitalocean.com/v2/images/7938269/actions"
    
    # Convert an Image into a Snapshot
    curl -X POST \
      -H "Content-Type: application/json" \
      -H "Authorization: Bearer $DIGITALOCEAN_TOKEN" \
      -d '{"type":"convert"}' \
      "https://api.digitalocean.com/v2/images/7938291/actions"

    Go

    Go developers can use Godo, the official DigitalOcean V2 API client for Go. To add an image to a region with Godo, use the following code:

    
                    import (
        "context"
        "os"
    
        "github.com/digitalocean/godo"
    )
    
    func main() {
        token := os.Getenv("DIGITALOCEAN_TOKEN")
    
        client := godo.NewFromToken(token)
        ctx := context.TODO()
    
        // Transfer an existing image
        transferRequest := &godo.ActionRequest{
            "type":   "transfer",
            "region": "nyc2",
        }
      # Transfer an Image
        transfer, _, err := client.ImageActions.Transfer(ctx, 7938269, transferRequest)
    
      # Convert an Image to a Snapshot
      # client.image_actions.convert(image_id: 7938269)
    
    }

    Ruby

    Ruby developers can use DropletKit, the official DigitalOcean V2 API client for Ruby. To add an image to a region with DropletKit, use the following code:

    
                    require 'droplet_kit'
    token = ENV['DIGITALOCEAN_TOKEN']
    client = DropletKit::Client.new(access_token: token)
    
    # Transfer an Image
    client.image_actions.transfer(image_id: 7938269, region: 'nyc2')
    
    # Convert an Image to a Snapshot
    # client.image_actions.convert(image_id: 7938269)

    Python

    
                    import os
    from pydo import Client
    
    client = Client(token=os.environ.get("DIGITALOCEAN_TOKEN"))
    
    req = {
      "type": "convert"
    }
    resp = client.image_actions.post(image_id=342341, body=req)

Convert to a Snapshot using the Control Panel

To convert a backup to a snapshot, from the control panel, find the selected Droplet and click its X backup(s) dropdown. Backups remain available for four weeks after creation, even if the associated Droplet has since been deleted.
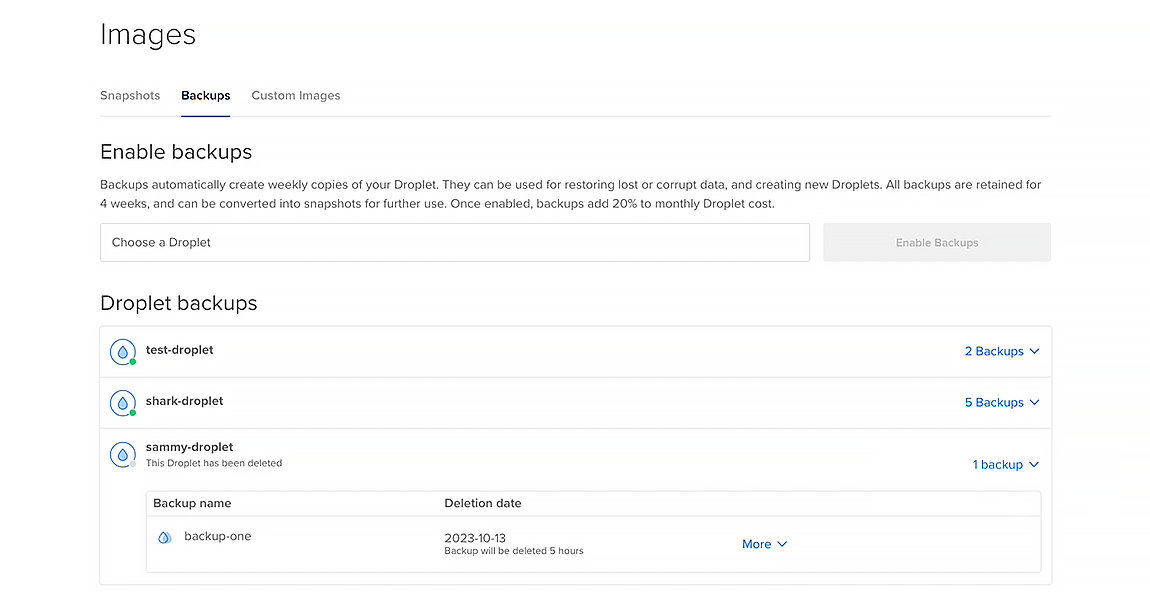
The backup list page with a deleted Droplet

Find the backup and click More to open the dropdown menu, then click Convert to snapshot.

You can create Droplets based on snapshots and copy snapshots to additional datacenter regions.