How to Enable Backups

Backups are automatically-created disk images of Droplets. Enabling backups for Droplets enables system-level backups at weekly intervals, which provides a way to revert to an older state or create new Droplets.


You can enable backups during Droplet creation and on existing Droplets.

During early availability, if you enable daily backups on production workloads, we recommend routinely converting those backups to snapshots to preserve any critical data in case of error.

Enable Backups during Droplet Creation

Using the Control Panel

To create a new Droplet with backups enabled, from the DigitalOcean Control Panel, open the Create menu and select Droplets.

Fill out the fields following the normal Droplet creation process. In the section, check Enable automated backups.

Here, you can select Weekly Backups or Daily Backups. Daily backups are in early availability for Droplets in NYC1, NYC3, SFO3, AMS3, and SGP1.

The backup window is a 4-hour window of time during which the Droplet automatically initiates a new backup. In the Backup Window section, use the dropdown menus to customize your Droplet’s backup window by choosing a time of day and, for weekly backups, a day of the week.

For more detailed steps on creating a Droplet, see How to Create a Droplet.

Using Automation

You can enable backups during Droplet creation by setting the backups field to true when using the Droplet creation command or endpoint.

How to create a Droplet using the DigitalOcean CLI

To create a Droplet via the command-line, follow these steps:

  1. Install doctl, the DigitalOcean command-line tool.

  2. Create a personal access token, and save it for use with doctl.

  3. Use the token to grant doctl access to your DigitalOcean account.

                  doctl auth init
                
  4. Finally, create a Droplet with doctl compute droplet create. The basic usage looks like this, but you'll want to read the usage docs for more details:

                  doctl compute droplet create <droplet-name>... [flags]
                

    The following example creates a Droplet named example-droplet with a two vCPUs, two GiB of RAM, and 20 GBs of disk space. The Droplet is created in the nyc1 region and is based on the ubuntu-20-04-x64 image. Additionally, the command uses the --user-data flag to run a Bash script the first time the Droplet boots up

                       doctl compute droplet create example-droplet --size s-2vcpu-2gb --image ubuntu-20-04-x64 --region nyc1 --user-data $'#!/bin/bash\n touch /root/example.txt; sudo apt update;sudo snap install doctl'
                    
How to create a Droplet using the DigitalOcean API

To create a Droplet using the DigitalOcean API, follow these steps:

  1. Create a personal access token, and save it for use with the API.

  2. Send a POST request to https://api.digitalocean.com/v2/droplets

    cURL

    To create a Droplet with cURL, call:

    
                    curl -X POST \
      -H "Content-Type: application/json" \
      -H "Authorization: Bearer $DIGITALOCEAN_TOKEN" \
      -d '{"name":"example.com","region":"nyc3","size":"s-1vcpu-1gb","image":"ubuntu-20-04-x64","ssh_keys":[289794,"3b:16:e4:bf:8b:00:8b:b8:59:8c:a9:d3:f0:19:fa:45"],"backups":true,"ipv6":true,"monitoring":true,"tags":["env:prod","web"],"user_data":"#cloud-config\nruncmd:\n  - touch /test.txt\n","vpc_uuid":"760e09ef-dc84-11e8-981e-3cfdfeaae000"}' \
      "https://api.digitalocean.com/v2/droplets"

    Go

    Go developers can use Godo, the official DigitalOcean V2 API client for Go. To create a Droplet with Godo, use the following code:

    
                    import (
        "context"
        "os"
    
        "github.com/digitalocean/godo"
    )
    
    func main() {
        token := os.Getenv("DIGITALOCEAN_TOKEN")
    
        client := godo.NewFromToken(token)
        ctx := context.TODO()
    
        createRequest := &godo.DropletCreateRequest{
            Name:   "example.com",
            Region: "nyc3",
            Size:   "s-1vcpu-1gb",
            Image: godo.DropletCreateImage{
                Slug: "ubuntu-20-04-x64",
            },
            SSHKeys: []godo.DropletCreateSSHKey{
                godo.DropletCreateSSHKey{ID: 289794},
                godo.DropletCreateSSHKey{Fingerprint: "3b:16:e4:bf:8b:00:8b:b8:59:8c:a9:d3:f0:19:fa:45"}
            },
            Backups: true,
            IPv6: true,
            Monitoring: true,
            Tags: []string{"env:prod","web"},
            UserData: "#cloud-config\nruncmd:\n  - touch /test.txt\n",
            VPCUUID: "760e09ef-dc84-11e8-981e-3cfdfeaae000",
        }

    Ruby

    Ruby developers can use DropletKit, the official DigitalOcean V2 API client for Ruby. To create a Droplet with DropletKit, use the following code:

    
                    require 'droplet_kit'
    token = ENV['DIGITALOCEAN_TOKEN']
    client = DropletKit::Client.new(access_token: token)
    
    droplet = DropletKit::Droplet.new(
      name: 'example.com',
      region: 'nyc3',
      size: 's-1vcpu-1gb',
      image: 'ubuntu-20-04-x64',
      ssh_keys: [289794,"3b:16:e4:bf:8b:00:8b:b8:59:8c:a9:d3:f0:19:fa:45"],
      backups: true,
      ipv6: true,
      monitoring: true,
      tags: ["env:prod","web"],
      user_data: "#cloud-config\nruncmd:\n  - touch /test.txt\n",
      vpc_uuid: "760e09ef-dc84-11e8-981e-3cfdfeaae000",
    )
    client.droplets.create(droplet)

    Python

    
                    import os
    from pydo import Client
    
    client = Client(token=os.environ.get("DIGITALOCEAN_TOKEN"))
    
    req = {
      "name": "example.com",
      "region": "nyc3",
      "size": "s-1vcpu-1gb",
      "image": "ubuntu-20-04-x64",
      "ssh_keys": [
        289794,
        "3b:16:e4:bf:8b:00:8b:b8:59:8c:a9:d3:f0:19:fa:45"
      ],
      "backups": True,
      "ipv6": True,
      "monitoring": True,
      "tags": [
        "env:prod",
        "web"
      ],
      "user_data": "#cloud-config\nruncmd:\n  - touch /test.txt\n",
      "vpc_uuid": "760e09ef-dc84-11e8-981e-3cfdfeaae000"
    }
    
    resp = client.droplets.create(body=req)

If you’re using the API to create a Droplet, you can enable backups by adding "backups": true to the request body.

Enable Backups on an Existing Droplet

Using the Control Panel

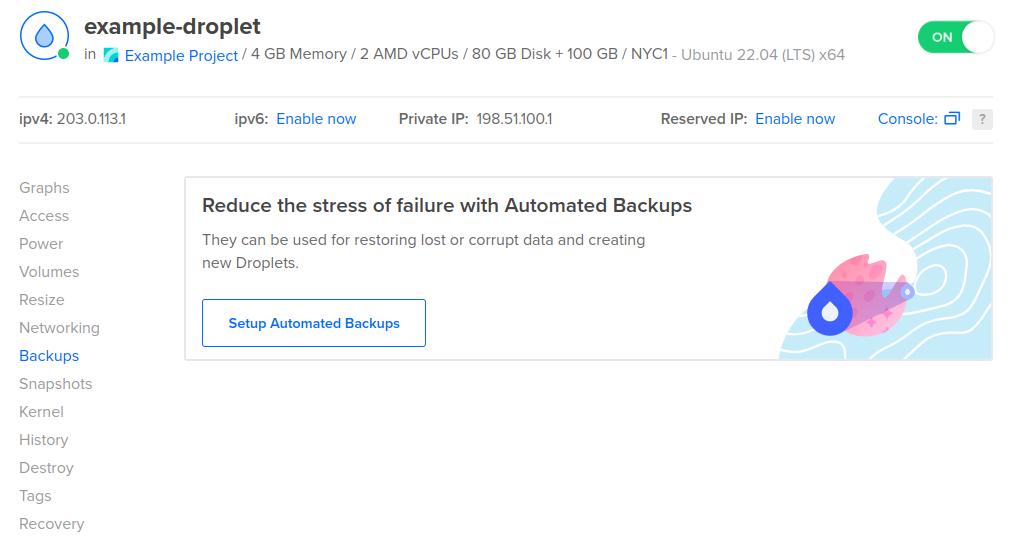
To enable Droplet backups on an existing Droplet, from the control panel, select Droplets and click the Droplet you want to enable daily backups on. Then, click Backups in the left menu of the Droplet page.

The Droplet Backups page with enable backups available

If the Droplet already has weekly backups enabled, click the Edit Settings button. If the Droplet does not already have backups enabled, click the Setup Automated Backups button.

Here, you can select Weekly Backups or Daily Backups. Daily backups are in early availability for Droplets in NYC1, NYC3, SFO3, AMS3, and SGP1.

The backup window is a 4-hour window of time during which the Droplet automatically initiates a new backup. In the Backup Window section, use the dropdown menus to customize your Droplet’s backup window by choosing a time of day and, for weekly backups, a day of the week.

To confirm your changes, click Enable Backups or Save Backup Settings.

Using Automation

You can enable Droplet backups using the following doctl command, or by sending a request to the Droplet action endpoint and setting the enable_backups field to true.

How to enable Droplet backups using the DigitalOcean CLI

To enable Droplet backups via the command-line, follow these steps:

  1. Install doctl, the DigitalOcean command-line tool.

  2. Create a personal access token, and save it for use with doctl.

  3. Use the token to grant doctl access to your DigitalOcean account.

                  doctl auth init
                
  4. Finally, enable Droplet backups with doctl compute droplet-action enable-backups. The basic usage looks like this, but you'll want to read the usage docs for more details:

                  doctl compute droplet-action enable-backups <droplet-id> [flags]
                

    The following example enables backups on a Droplet with the ID 386734086

                       doctl compute droplet-action enable-backups 386734086
                    
How to enable Droplet backups using the DigitalOcean API

To enable Droplet backups using the DigitalOcean API, follow these steps:

  1. Create a personal access token, and save it for use with the API.

  2. Send a POST request to https://api.digitalocean.com/v2/droplets/{droplet_id}/actions

    cURL

    To enable Droplet backups with cURL, call:

    
                    # Enable Backups
    curl -X POST \
      -H "Content-Type: application/json" \
      -H "Authorization: Bearer $DIGITALOCEAN_TOKEN" \
      -d '{"type":"enable_backups"}' \
      "https://api.digitalocean.com/v2/droplets/3164450/actions"
    
    # Disable Backups
    curl -X POST \
      -H "Content-Type: application/json" \
      -H "Authorization: Bearer $DIGITALOCEAN_TOKEN" \
      -d '{"type":"disable_backups"}' \
      "https://api.digitalocean.com/v2/droplets/3164450/actions"
    
    # Reboot a Droplet
    curl -X POST \
      -H "Content-Type: application/json" \
      -H "Authorization: Bearer $DIGITALOCEAN_TOKEN" \
      -d '{"type":"reboot"}' \
      "https://api.digitalocean.com/v2/droplets/3164450/actions"
    
    # Power cycle a Droplet
    curl -X POST \
      -H "Content-Type: application/json" \
      -H "Authorization: Bearer $DIGITALOCEAN_TOKEN" \
      -d '{"type":"power_cycle"}' \
      "https://api.digitalocean.com/v2/droplets/3164450/actions"
    
    # Shutdown and Droplet
    curl -X POST \
      -H "Content-Type: application/json" \
      -H "Authorization: Bearer $DIGITALOCEAN_TOKEN" \
      -d '{"type":"shutdown"}' \
      "https://api.digitalocean.com/v2/droplets/3067649/actions"
    
    # Power off a Droplet
    curl -X POST \
      -H "Content-Type: application/json" \
      -H "Authorization: Bearer $DIGITALOCEAN_TOKEN" \
      -d '{"type":"power_off"}' \
      "https://api.digitalocean.com/v2/droplets/3164450/actions"
    
    # Power on a Droplet
    curl -X POST \
      -H "Content-Type: application/json" \
      -H "Authorization: Bearer $DIGITALOCEAN_TOKEN" \
      -d '{"type":"power_on"}' \
      "https://api.digitalocean.com/v2/droplets/3164450/actions"
    
    # Restore a Droplet
    curl -X POST \
      -H "Content-Type: application/json" \
      -H "Authorization: Bearer $DIGITALOCEAN_TOKEN" \
      -d '{"type":"restore", "image": 12389723 }' \
      "https://api.digitalocean.com/v2/droplets/3067649/actions"
    
    # Password Reset a Droplet
    curl -X POST \
      -H "Content-Type: application/json" \
      -H "Authorization: Bearer $DIGITALOCEAN_TOKEN" \
      -d '{"type":"password_reset"}' \
      "https://api.digitalocean.com/v2/droplets/3164450/actions"
    
    # Resize a Droplet
    curl -X POST \
      -H "Content-Type: application/json" \
      -H "Authorization: Bearer $DIGITALOCEAN_TOKEN" \
      -d '{"type":"resize","size":"1gb"}' \
      "https://api.digitalocean.com/v2/droplets/3164450/actions"
    
    # Rebuild a Droplet
    curl -X POST \
      -H "Content-Type: application/json" \
      -H "Authorization: Bearer $DIGITALOCEAN_TOKEN" \
      -d '{"type":"rebuild","image":"ubuntu-16-04-x64"}' \
      "https://api.digitalocean.com/v2/droplets/3164450/actions"
    
    # Rename a Droplet
    curl -X POST \
      -H "Content-Type: application/json" \
      -H "Authorization: Bearer $DIGITALOCEAN_TOKEN" \
      -d '{"type":"rename","name":"nifty-new-name"}' \
      "https://api.digitalocean.com/v2/droplets/3164450/actions"
    
    # Change the Kernel
    curl -X POST \
      -H "Content-Type: application/json" \
      -H "Authorization: Bearer $DIGITALOCEAN_TOKEN" \
      -d '{"type":"change_kernel","kernel":991}' \
      "https://api.digitalocean.com/v2/droplets/3164450/actions"
    
    # Enable IPv6
    curl -X POST \
      -H "Content-Type: application/json" \
      -H "Authorization: Bearer $DIGITALOCEAN_TOKEN" \
      -d '{"type":"enable_ipv6"}' \
      "https://api.digitalocean.com/v2/droplets/3164450/actions"
    
    # Enable Private Networking
    curl -X POST \
      -H "Content-Type: application/json" \
      -H "Authorization: Bearer $DIGITALOCEAN_TOKEN" \
      -d '{"type":"enable_private_networking"}' \
      "https://api.digitalocean.com/v2/droplets/3164450/actions"
    
    # Snapshot a Droplet
    curl -X POST \
      -H "Content-Type: application/json" \
      -H "Authorization: Bearer $DIGITALOCEAN_TOKEN" \
      -d '{"type":"snapshot","name":"Nifty New Snapshot"}' \
      "https://api.digitalocean.com/v2/droplets/3164450/actions"
    
    # Acting on Tagged Droplets
    curl -X POST \
      -H "Content-Type: application/json" \
      -H "Authorization: Bearer $DIGITALOCEAN_TOKEN" \
      -d '{"type":"enable_backups"}' \
      "https://api.digitalocean.com/v2/droplets/actions?tag_name=awesome"
    
    # Retrieve a Droplet Action
    curl -X GET \
      -H "Content-Type: application/json" \
      -H "Authorization: Bearer $DIGITALOCEAN_TOKEN" \
      "https://api.digitalocean.com/v2/droplets/3164444/actions/36804807"

    Go

    Go developers can use Godo, the official DigitalOcean V2 API client for Go. To enable Droplet backups with Godo, use the following code:

    
                    import (
        "context"
        "os"
    
        "github.com/digitalocean/godo"
    )
    
    func main() {
        token := os.Getenv("DIGITALOCEAN_TOKEN")
    
        client := godo.NewFromToken(token)
        ctx := context.TODO()
    // Enable Backups
        action, _, err := client.DropletActions.EnableBackups(ctx, 3164450)
    
    // Disable Backups
    //  action, _, err := client.DropletActions.DisableBackups(ctx, 3164450)
    
    // Reboot a Droplet
    //  action, _, err := client.DropletActions.Reboot(ctx, 3164450)
    
    // Power Cycle a Droplet
    //  action, _, err := client.DropletActions.PowerCycle(ctx, 3164450)
    
    // Shutdown a Droplet
    //  action, _, err := client.DropletActions.Shutdown(ctx, 3067649)
    
    // Power Off a Droplet
    //  action, _, err := client.DropletActions.PowerOff(ctx, 3164450)
    
    // Power On a Droplet
    //  action, _, err := client.DropletActions.PowerOn(ctx, 3164450)
    
    // Restore a Droplet
    //  action, _, err := client.DropletActions.Restore(ctx, 3164449, 12389723)
    
    // Password Reset a Droplet
    //  action, _, err := client.DropletActions.PasswordReset(ctx, 3164450)
    
    // Resize a Droplet
    //  action, _, err := client.DropletActions.Resize(ctx, 3164450, "1gb", true)
    
    // Rebuild a Droplet
    //  action, _, err := client.DropletActions.RebuildByImageSlug(ctx, 3164450, "ubuntu-16-04-x64")
    
    // Rename a Droplet
    //  action, _, err := client.DropletActions.Rename(ctx, 3164450, "nifty-new-name")
    
    // Change the Kernel
    //  action, _, err := client.DropletActions.ChangeKernel(ctx, 3164450, 991)
    
    // Enable IPv6
    //  action, _, err := client.DropletActions.EnableIPv6(ctx, 3164450)
    
    // Enable Private Networking
    //  action, _, err := client.DropletActions.EnablePrivateNetworking(ctx, 3164450)
    
    // Snapshot a Droplet
    //  action, _, err := client.DropletActions.Snapshot(ctx, 3164450, "Nifty New Snapshot")
    
    // Retrieve a Droplet Action
    //  action, _, err := client.DropletActions.Get(ctx, 3164450, 36804807)
    
    }

    Ruby

    Ruby developers can use DropletKit, the official DigitalOcean V2 API client for Ruby. To enable Droplet backups with DropletKit, use the following code:

    
                    require 'droplet_kit'
    token = ENV['DIGITALOCEAN_TOKEN']
    client = DropletKit::Client.new(access_token: token)
    
    # Enable Backups
    client.droplet_actions.enable_backups(droplet_id: 3164450)
    
    # Disable Backups
    # client.droplet_actions.disable_backups(droplet_id: 3164450)
    
    # Reboot a Droplet
    # client.droplet_actions.reboot(droplet_id: 3164450)
    
    # Power Cycle a Droplet
    # client.droplet_actions.power_cycle(droplet_id: 3164450)
    
    # Shutdown a Droplet
    # client.droplet_actions.shutdown(droplet_id: 3067649)
    
    # Power Off a Droplet
    # client.droplet_actions.power_off(droplet_id: 3164450)
    
    # Power On a Droplet
    # client.droplet_actions.power_on(droplet_id: 3164450)
    
    # Restore a Droplet
    # client.droplet_actions.restore(droplet_id: 3067649, image: 12389723)
    
    # Password Reset a Droplet
    # client.droplet_actions.password_reset(droplet_id: 3164450)
    
    # Resize a Droplet
    # client.droplet_actions.resize(droplet_id: 3164450, size: '1gb')
    
    # Rebuild a Droplet
    # client.droplet_actions.rebuild(droplet_id: 3164450, image: 'ubuntu-16-04-x64')
    
    # Rename a Droplet
    # client.droplet_actions.rename(droplet_id: 3164450, name: 'nifty-new-name')
    
    # Change the Kernel
    # client.droplet_actions.change_kernel(droplet_id: 3164450, kernel: 991)
    
    # Enable IPv6
    # client.droplet_actions.enable_ipv6(droplet_id: 3164450)
    
    # Enable Private Networking
    # client.droplet_actions.enable_private_networking(droplet_id: 3164450)
    
    # Snapshot a Droplet
    # client.droplet_actions.snapshot(droplet_id: 3164450, name: 'Nifty New Snapshot')

    Python

    
                    import os
    from pydo import Client
    
    client = Client(token=os.environ.get("DIGITALOCEAN_TOKEN"))
    
    # enable back ups example
    req = {
      "type": "enable_backups"
    }
    
    resp = client.droplet_actions.post(droplet_id=346652, body=req)