Mastodon
Mastodon is free and open-source software that provides instant global communication. Each Mastodon server is a completely independent entity, able to interoperate with others to form one global social network. Built on open web protocols, Mastodon can speak with any other platform that implements ActivityPub. With one account you get access to a whole universe of social apps — the fediverse.
Before you deploy your first Mastodon Droplet
Get a Domain name
Use this DNS quickstart guide to get your DNS setup on DigitalOcean. You’ll first need to purchase and register your domain through a third party, such as Name.com, GoDaddy, etc…
- Why do you need a domain name?
This is how others will access your server and how you and your users will be identified on the network.
Set up SMTP
You’ll need to get SMTP credentials for sending emails. This can be from an email delivery service like SparkPost, Sendgrid, Mailgun, etc.
- Why do you need SMTP?
Mastodon uses SMTP to send verification emails to users signing up on your server. Without enabling an SMTP provider, your users won’t be able to sign up on your server. SMTP is also used for password resets, email verifications and security events.
Optional: Deploy and Connect to Object Storage (DigitalOcean Spaces Object Storage, Wasabi, Minio or AWS S3)
You’ll need access credentials for your preferred storage system. This guide will walk through setting up and connecting DigitalOcean Spaces Object Storage.
- Why do I need object storage?
These buckets are used to store images, video and audio or whatever users will want to upload. Without Object storage, you will need to use your local database, which can be slow and overloaded quickly.
Software Included
| Package | Version | License |
|---|---|---|
| Mastodon | 4.2.1 | AGPLv3 |
| Nginx | 1.24.0 | Custom |
| Postgres | 16.1 | Postgres SQL |
| Certbot | 2.1.0 | Apache 2 |
| Redis | 7.2.3 | BSD-3-Clause |
Creating an App using the Control Panel
Click the Deploy to DigitalOcean button to create a Droplet based on this 1-Click App. If you aren’t logged in, this link will prompt you to log in with your DigitalOcean account.
Creating an App using the API
In addition to creating a Droplet from the Mastodon 1-Click App using the control panel, you can also use the DigitalOcean API. As an example, to create a 4GB Mastodon Droplet in the SFO2 region, you can use the following curl command. You need to either save your API access token) to an environment variable or substitute it in the command below.
curl -X POST -H 'Content-Type: application/json' \
         -H 'Authorization: Bearer '$TOKEN'' -d \
        '{"name":"choose_a_name","region":"sfo2","size":"s-2vcpu-4gb","image": "mastodon-18-04"}' \
        "https://api.digitalocean.com/v2/droplets"
Getting Started After Deploying Mastodon
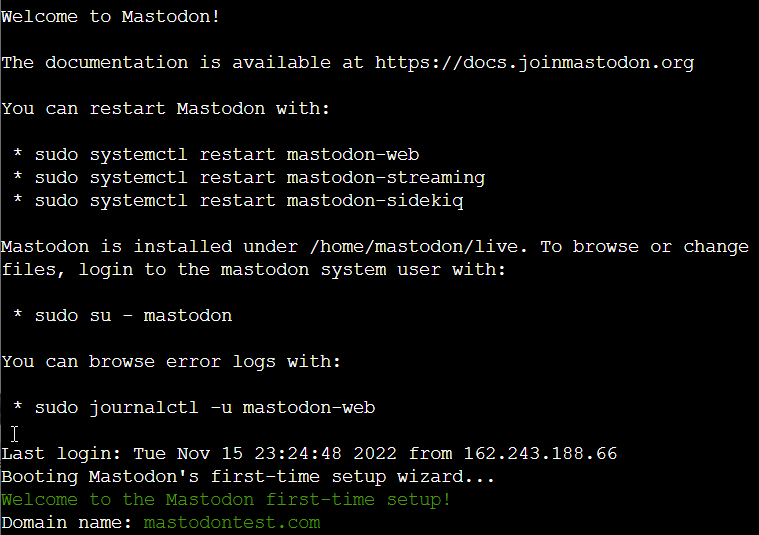
On your first SSH login to the droplet or launch of the Droplet console of your Mastodon Droplet 1-Click, you will be greeted by a setup wizard that will guide you through creating a working Mastodon server.
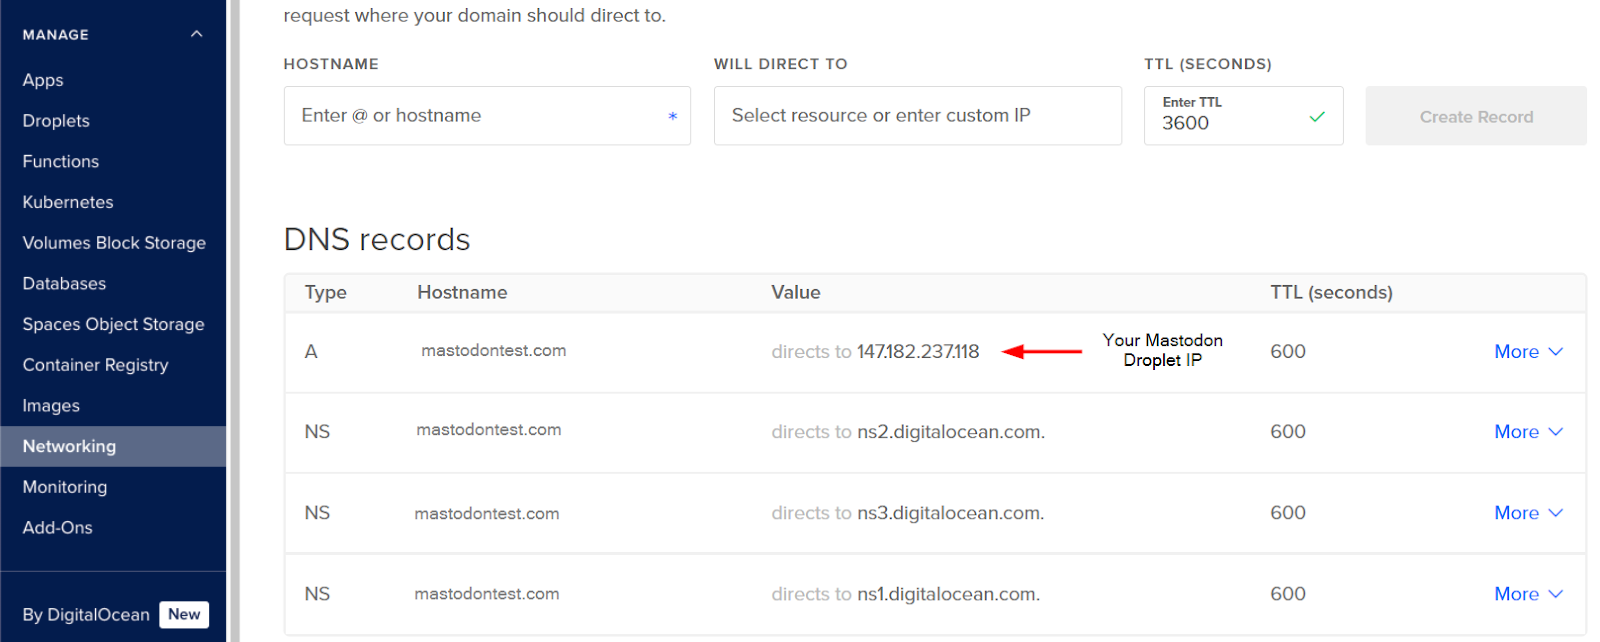
The first step of the setup wizard is to enter your domain name. Before doing this, add an A record with your DNS host that points to the new droplet IP (see this guide for more help). If your DNS is hosted with DigitalOcean, adding the A record will look like this:

The DNS Host may be the same company you registered the domain with, or another entity you designate. To connect your DNS hosting to DigitalOcean, check out this guide.
Once your A record is set up, you are ready to enter your domain using the wizard:

Next, the setup wizard will ask you if you want to store user-uploaded files on the cloud.
This is an optional step. We will use DigitalOcean Spaces Object Storage for this. If you already have a DigitalOcean Space set up, you can skip the next step.
Click “Create” and then “Spaces Object Storage” from the top menu. Follow the prompts to configure your object storage Space. When completed, you should see your Spaces Bucket:

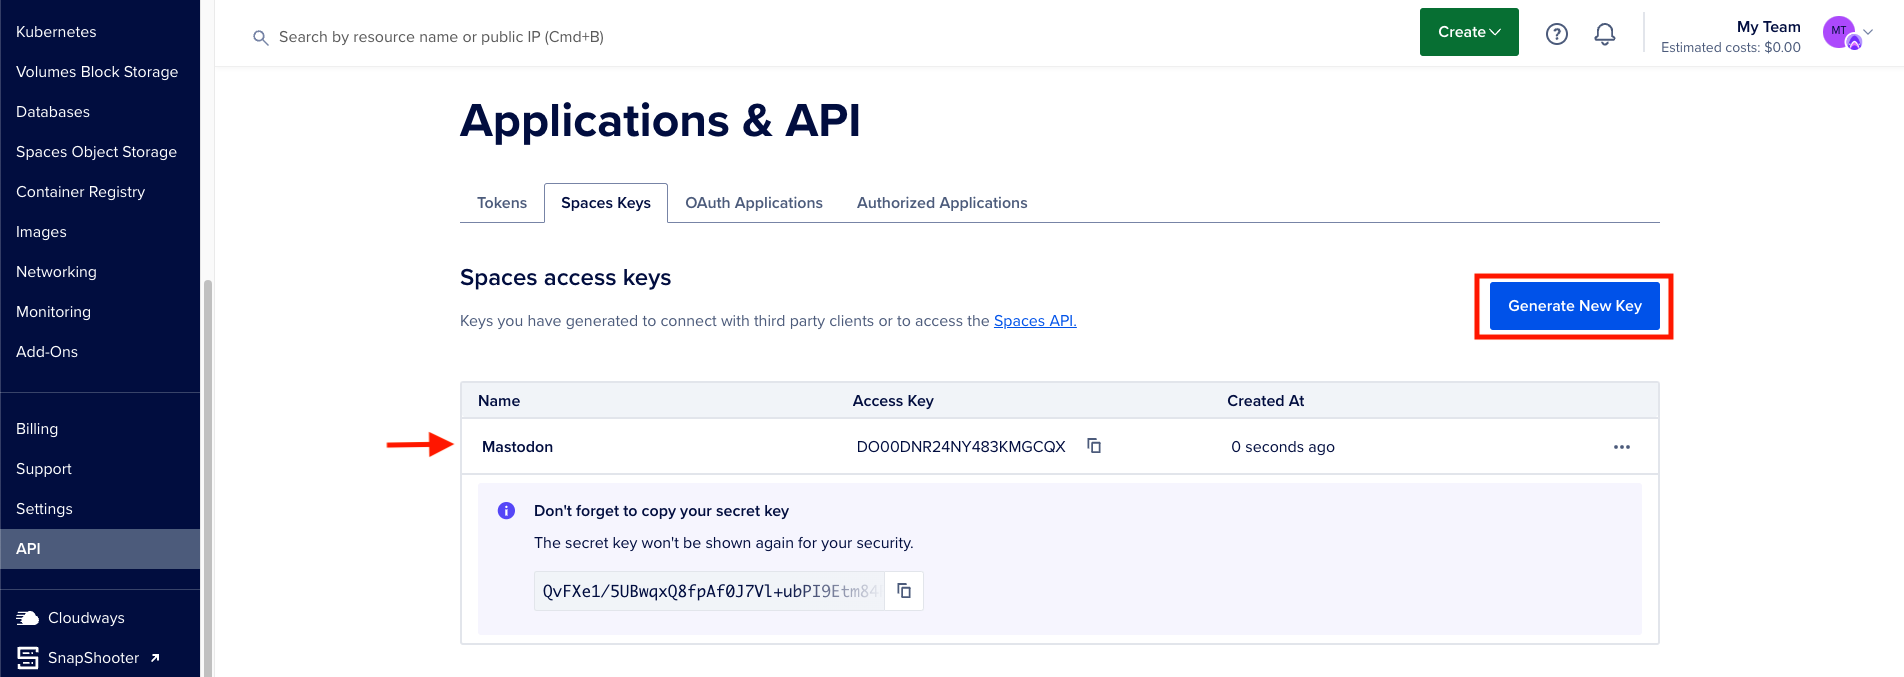
Next, go to API, then “Spaces Keys” and click “Generate New Key” to Generate a new Spaces Access Key + Secret Pair.

- IMPORTANT: If you refresh or leave the page you’ll lose the secret forever and you’ll need to regenerate the Key + Secret pair.
- You’ll also need to grab the name of your Spaces Bucket:
mastodon-testin the screenshot above. - The region of your Space is the 4 digit region id. For example:
nyc3 - Your Space endpoint can be found on the Settings tab. For example:
nyc3.digitaloceanspaces.com
Back on the Mastodon setup wizard, you’ll need to enter your Spaces Access and Secret Keys as shown below with:

We recommend selecting “no” to uploading files from your own domain

SMTP Credentials can be acquired from your email provider. The example below is using Mailgun but you can use Sendgrid, Sparkpost, etc.

You’ll need to add your own SMTP username and password. These can be found with your provider.
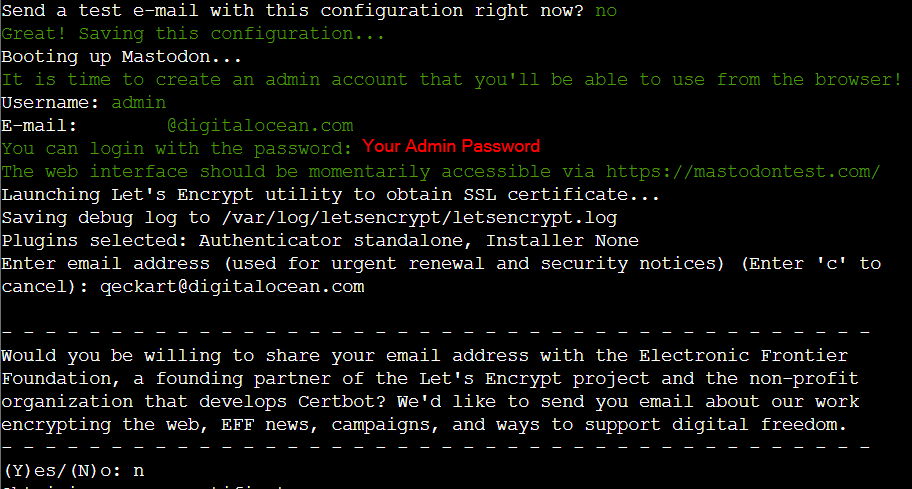
The next step is to create an admin account with an email address that you own.
WARNING: Once you enter an admin account name email, you will be provided with a password in the console. Without this password, you’ll be unable to login and will have to start over by creating a new Mastodon Droplet 1-Click.

After selecting Y/N to share your email address with the Electronic Frontier Foundation, it will take a few minutes for your Mastodon server to be made available at your specified domain. Our Mastodon server should be available after a few minutes at the domain you specified at the beginning. You may see a Mastodon provided ‘Error’ screen at first; a login screen should appear once your server is finished being deployed.
Common Issues:
If you get an error message during the setup process, relaunch the droplet by closing and reopening the console. If after relaunch setup wizard doesn’t start you’ll need to create a new Droplet and start over again.
Getting started with Mastodon
Refer to this guide to get started with Mastodon once your server is up and running.
You can use this admin tool to perform different moderation/maintenance actions with your server. For example, it can be used to rotate the RSA keys for all users, safely delete your Mastodon server from the network, create and manage user accounts, approve registrations, clear server cache, remove locally cached copies of media attachments from other servers and remove media files which do not belong anywhere.
Changing your settings (or fixing mistakes)
You can update or change any of the values entered by using SSH to access the Mastodon droplet and following these steps:
- SSH to the droplet
- Login as mastodon system user
$ sudo su - mastodon
3. Navigate to the location of the Mastodon software code:
$ cd /home/mastodon/live
4. Edit the the .env.production file
$ nano .env.production
5. Restart the Mastodon Services
$ sudo systemctl restart mastodon-web
$ sudo systemctl restart mastodon-streaming
$ sudo systemctl restart mastodon-sidekiq
Official Documentation
Refer to the Mastodon official documentation for more details.