How to Scale Load Balancers

DigitalOcean Load Balancers are a fully managed, highly available network load balancing service. Load balancers distribute traffic to groups of Droplets, which prevents the health of a backend service from depending on the health of a single server.


Scaling a load balancer lets you adjust its performance to its workload by changing the number of nodes the load balancer contains. You can scale load balancers up or down at anytime to meet your traffic needs.

You can scale a load balancer to adjust its performance to its workload. Scaling changes the number of nodes the load balancer contains. You can scale load balancers up or down at anytime to meet your traffic needs.

Each additional node increases the load balancer’s maximum:

  • Requests per second by 10,000
  • Simultaneous connections by 10,000
  • New SSL connections per second by 250

You can add up to 100 nodes to a load balancer.

Note
When scaling a load balancer down, each node is given one minute to drain the remaining connections. Any connections that remain after one minute will be closed. This may cause a brief disruption in traffic to the load balancer. Make any appropriate changes to your network before scaling to avoid disruptions in your production traffic.

Scale a Load Balancer Using the CLI

Use the --size-unit flag to set the new number of nodes for the load balancer.

How to scale a load balancer using the DigitalOcean CLI

To scale a load balancer via the command-line, follow these steps:

  1. Install doctl, the DigitalOcean command-line tool.

  2. Create a personal access token, and save it for use with doctl.

  3. Use the token to grant doctl access to your DigitalOcean account.

                  doctl auth init
                
  4. Finally, scale a load balancer with doctl compute load-balancer update. The basic usage looks like this, but you'll want to read the usage docs for more details:

                  doctl compute load-balancer update <id> [flags]
                

Scale a Load Balancer Using the API

Use the size_unit field to set the new number of nodes for the load balancer.

How to scale a load balancer using the DigitalOcean API

To scale a load balancer using the DigitalOcean API, follow these steps:

  1. Create a personal access token, and save it for use with the API.

  2. Send a PUT request to https://api.digitalocean.com/v2/load_balancers/{lb_id}

    cURL

    To scale a load balancer with cURL, call:

    
                    curl -X PUT \
      -H "Content-Type: application/json" \
      -H "Authorization: Bearer $DIGITALOCEAN_TOKEN" \
      -d '{"name":"example-lb-01","size_unit":"2","region":"nyc3","algorithm":"least_connections","forwarding_rules":[{"entry_protocol":"http","entry_port":80,"target_protocol":"http","target_port":80},{"entry_protocol":"https","entry_port":444,"target_protocol":"https","target_port":443,"tls_passthrough":true}],"health_check":{"protocol":"http","port":80,"path":"/","check_interval_seconds":10,"response_timeout_seconds":5,"healthy_threshold":5,"unhealthy_threshold":3},"sticky_sessions":{"type":"cookies", "cookie_name": "DO_LB", "cookie_ttl_seconds": 300}, "firewall":{"deny":["ip:1.2.3.4","cidr:2.3.4.0/24"], "allow":["cidr:1.2.0.0/16","ip:2.3.4.5"]}, "droplet_ids": [3164444, 3164445]}' \
      "https://api.digitalocean.com/v2/load_balancers/4de7ac8b-495b-4884-9a69-1050c6793cd6"

    Go

    Go developers can use Godo, the official DigitalOcean V2 API client for Go. To scale a load balancer with Godo, use the following code:

    
                    import (
        "context"
        "os"
    
        "github.com/digitalocean/godo"
    )
    
    func main() {
        token := os.Getenv("DIGITALOCEAN_TOKEN")
    
        client := godo.NewFromToken(token)
        ctx := context.TODO()
    
        updateRequest := &godo.LoadBalancerRequest{
            Name:      "example-01",
            SizeUnit: "2",
            Algorithm: "round_robin",
            Region:    "nyc3",
            ForwardingRules: []godo.ForwardingRule{
                {
                    EntryProtocol:  "http",
                    EntryPort:      80,
                    TargetProtocol: "http",
                    TargetPort:     80,
                },
                {
                    EntryProtocol:  "https",
                    EntryPort:      443,
                    TargetProtocol: "https",
                    TargetPort:     443,
                    TlsPassthrough: true,
                },
            },
            HealthCheck: &godo.HealthCheck{
                Protocol:               "http",
                Port:                   80,
                Path:                   "/",
                CheckIntervalSeconds:   10,
                ResponseTimeoutSeconds: 5,
                HealthyThreshold:       5,
                UnhealthyThreshold:     3,
            },
            StickySessions: &godo.StickySessions{
                Type:             "cookies",
                CookieName:       "DO_LB",
                CookieTtlSeconds: 300,
            },
            DropletIDs:          []int{3164444, 3164445},
            RedirectHttpToHttps: false,
            Firewall:            &godo.LBFirewall{
                Deny: []string{"ip:1.2.3.4", "cidr:2.3.4.0/24"},
                Allow: []string{"cidr:1.2.0.0/16", "ip:2.3.4.5"},
            }
        }
    
        lb, _, err := c.LoadBalancers.Update(ctx, "c2c97ca7-6f63-4e23-8909-906fd86efb5e", updateRequest)
    }

    Ruby

    Ruby developers can use DropletKit, the official DigitalOcean V2 API client for Ruby. To scale a load balancer with DropletKit, use the following code:

    
                    require 'droplet_kit'
    token = ENV['DIGITALOCEAN_TOKEN']
    client = DropletKit::Client.new(access_token: token)
    
    load_balancer = DropletKit::LoadBalancer.new(
      name: 'example-lb-01',
      size_unit: '2',
      algorithm: 'round_robin',
      droplet_ids: [ 3164444, 3164445],
      redirect_http_to_https: true,
      region: 'nyc3',
      forwarding_rules: [
        DropletKit::ForwardingRule.new(
          entry_protocol: 'http',
          entry_port: 80,
          target_protocol: 'http',
          target_port: 80,
          certificate_id: '',
          tls_passthrough: false
        ),
        DropletKit::ForwardingRule.new(
          entry_protocol: 'https',
          entry_port: 443,
          target_protocol: 'https',
          target_port: 443,
          certificate_id: '',
          tls_passthrough: true
        )
      ],
      sticky_sessions: DropletKit::StickySession.new(
        type: 'cookies',
        cookie_name: 'DO-LB-COOKIE',
        cookie_ttl_seconds: 5
      ),
      health_check: DropletKit::HealthCheck.new(
        protocol: 'http',
        port: 80,
        path: '/',
        check_interval_seconds: 10,
        response_timeout_seconds: 5,
        healthy_threshold: 5,
        unhealthy_threshold: 3
      )
    )
    client.load_balancers.update(load_balancer, id: '4de7ac8b-495b-4884-9a69-1050c6793cd6')

    Python

    
                    import os
    from pydo import Client
    
    client = Client(token=os.environ.get("DIGITALOCEAN_TOKEN"))
    
    req = {
      "name": "updated-example-lb-01",
      "region": "nyc3",
      "droplet_ids": [
        3164444,
        3164445
      ],
      "algorithm": "round_robin",
      "forwarding_rules": [
        {
          "entry_protocol": "http",
          "entry_port": 80,
          "target_protocol": "http",
          "target_port": 80,
          "certificate_id": "",
          "tls_passthrough": false
        },
        {
          "entry_protocol": "https",
          "entry_port": 443,
          "target_protocol": "https",
          "target_port": 443,
          "certificate_id": "",
          "tls_passthrough": true
        }
      ],
      "health_check": {
        "protocol": "http",
        "port": 80,
        "path": "/",
        "check_interval_seconds": 10,
        "response_timeout_seconds": 5,
        "healthy_threshold": 5,
        "unhealthy_threshold": 3
      },
      "sticky_sessions": {
        "type": "none"
      },
      "redirect_http_to_https": False,
      "enable_proxy_protocol": True,
      "enable_backend_keepalive": True,
      "vpc_uuid": "c33931f2-a26a-4e61-b85c-4e95a2ec431b",
      "project_id": "9cc10173-e9ea-4176-9dbc-a4cee4c4ff30",
      "http_idle_timeout_seconds": 60,
      "firewall": {
        "deny": [
          "cidr:1.2.0.0/16",
          "ip:2.3.4.5"
        ],
        "allow": [
          "ip:1.2.3.4",
          "cidr:2.3.4.0/24"
        ]
      }
    }
    resp = client.load_balancers.update(lb_id="fda9fda", body=req)

Scale a Load Balancer Using the Control Panel

To scale a load balancer from the DigitalOcean Control Panel, click Networking, then click Load Balancers to go to the load balancer overview page. Click on the name of the load balancer you want to scale, then click the Settings tab.

Load balancer Settings menu with Scaling Configuration Resize button highlighted

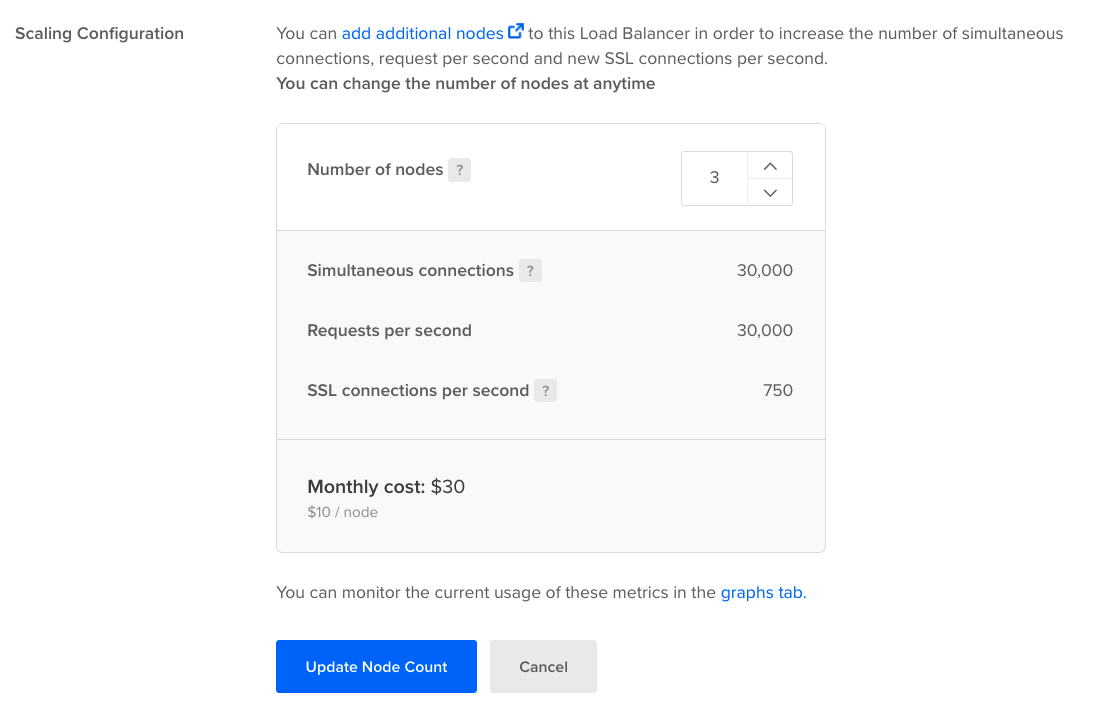
In the Scaling Configuration section, click Resize. In the Number of nodes field, select the new amount of nodes you would like the load balancer to scale to. As you change the amount of nodes, the load balancer’s connection specifications and price update to give you an overview of the load balancer’s overall capabilities and monthly cost.

Load balancer Settings section with Scaling Configuration open

Once you’ve selected the new number of nodes, click Update Node Count. The load balancer drops all open connections and then scales.

Once the load balancer has scaled, the Scaling Configuration section of the Settings page reflects the load balancer’s new amount of nodes.